|
|
 |
 |
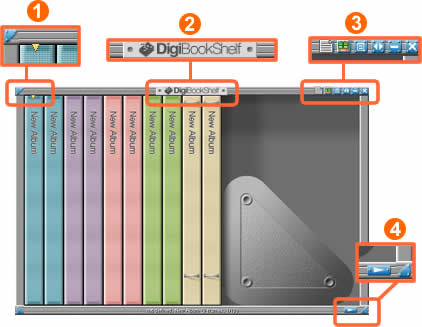
| (1) Selected Album |
| An yellow arrow indicates a selected album. To select multiple albums, click each album while holding down the CTRL button. |
|
| (2) Moving a bookshelf |
| Roll your mouse over the title bar and drag the bookshelf when a pointer changes to a hand icon. |
|
| (3) Bookshelf toolbar |
|
|
 |
Notify Service
Click this icon to open a small window that will display updated information regarding DigiBook®. |
|
|
|
 |
Album Gallery
Click this icon to access an album gallery page on your browser. |
| |
|
 |
Bookshelf settings
Click this icon to open a Bookshelf settings window. |
|
|
|
 |
Bookshelf navigation
Click this icon to open another bookshelf if you have more than one bookshelf. |
|
|
|
 |
Hide bookshelf
Click this icon to hide your bookshelf in a Windows taskbar. |
|
|
|
 |
Quit DigiBook®
Click this icon to quit the application. |
|
|
| (4) Scroll arrow |
This arrow appears when there are more albums in a bookshelf than the bookshelf window can display. Click this arrow to display albums that are not shown.
Also, you can resize the bookshelf size by dragging an edge of the bookshelf. |
|
|
|
| |
 |
|
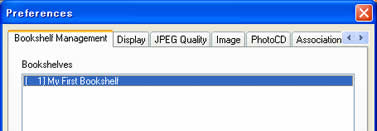
Preferences Button
Click a 'Preferences' button, located on the toolbar as shown above. |
| |
 |
| |
Preferences Settings Window
Preferences Settings Window as shown above will open. If you have yet to
create a new bookshelf, then only one bookshelf should be displayed. By default,
a bookshelf is titled, 'Not Defined' unless you have already named it. |
| |
 |
| |
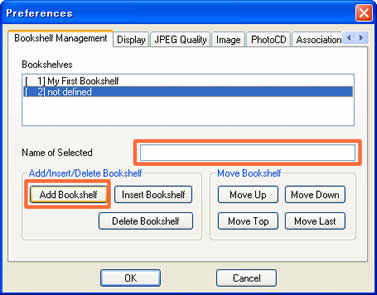
Create a new Bookshelf
Click 'Add Bookshelf' button to create a new bookshelf. An untitled new bookshelf will appear in as shown above.
Type a name for the new bookshelf in a textbox next to 'Name of Selected'. If you wish to delete a bookshelf, click 'Delete Bookshelf'.
Once you are content with the settings, click OK.
Please note:
If you modify bookshelf settings, all the bookshelves but the selected one will close for any change of settings to apply. Please rest assured that those bookshelves were NOT deleted.
|
| |
|
| |
 |
| |
Bookshelf Button
Click 'Open another Bookshelf' button, located on the toolbar as shown above. |
| |
 |
| |
Bookshelf Window
Click to select a bookshelf you wish to open, and click 'Open selected Bookshelf'.
Repeat this process to open more bookshelves. |
|
|
|