| Chapter 12: Keep your photo albums safe by creating backup |
|
|
 |
DigiBook® lets you easily keep your precious photos safe by creating a backup to burn to CD or DVD. Backup file includes all the albums in a bookshelf or bookshelves if you have more than one. If you have already spent lots of time creating albums, then now is the time to keep them safe for the future! |
| |
Creating backup file |
| |
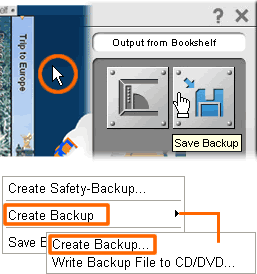 |
Right click on a bookshelf in an empty area or on a bookend to open a Menu Sheet.
Under [Output from Bookshelf], click [Save Backup] as shown on the left.
Click [Create Backup] > [Create Backup...]. |
|
| |
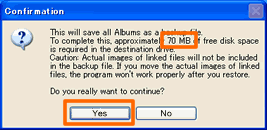 |
A dialog window will open to let you know the size of your total backup file. In this case, the backup file will be 70MB.
Click [Yes] to continue. |
|
| |

|
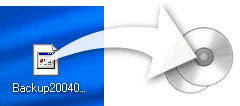
By default, the backup file is named "BACKUP.GBK". You can rename the file but please make sure to keep the ".GBK" extension at the end of the file name.
[Example]
Backup20050108.GBK
Mybackup01.GBK
etc.
Choose the destination to save the backup and click [Save]. |
|
| |
Now that the backup file is created, you can burn the file to CD or DVD.
*Restoring a backup file in DigiBook® is quite easy. Please have a look at "Restoring backup". |
| |
|
| |
| Restoring a backup file in DigiBook® is quite easy. However, please note that the albums in a backup file will replace all the albums currently stored on your bookshelf (bookshelves). So, please make sure to save any album that's not included in the backup before restoring a backup file.
You can save an album simply by drag an album off the bookshelf and drop it onto a Desktop. To add the album, simply drag it back to a bookshelf. |
| |
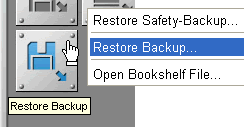 |
Right click on a bookshelf to open a Menu Sheet.
Click [Restore Backup] and [Restore Backup...]. |
|
| |
| Back to top > |
|
