| [ Preferences ] |
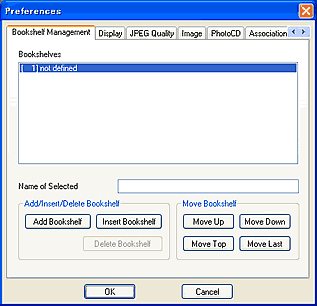
| Bookshelf Management |
|
|
Function
This menu is used for the settings of bookshelves such as
changing names, adding, deleting, and moving them.
Name of Selected Bookshelf
You can set add a name to a Bookshelf or change the names
of selected Bookshelves that you've selected in the "List
of Bookshelves".
Add/Insert/Delete Bookshelf
When you click "Add New Bookshelf", a new Bookshelf
is added to the Bookshelf list.
If you click "Insert New Bookshelf", a new Bookshelf
is created above the Bookshelf name that you have selected
in the list.
Move Bookshelf
You can change the position of selected Bookshelves by clicking
these buttons.
|
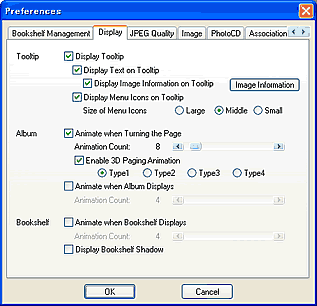
| Display |
|
|
Function
This is to carry out display-related settings such as whether
or not to display the tooltips, or to flip pages using animation.
Display Tooltip
This is to display the tooltip window as shown below.
You can move the position of this tooltip window on any
area of the program.
Animated when Turning the page
If you select this item, you will get animation when turning
the page. You can improve this animation by increasing the
value of the precision slider.
Enable 3D Page animation
You can see your album pages turn in an incredibly realistic
way with this 3D page-flipping function.
There are 4 types of page-flipping animations you can choose
from.
Animate when Album displays
If you select this item, the display of the album will be
animated. You can improve this animation by increasing the
value of the animation's precision slider.
Animate when Bookshelf displays
This will display the Bookshelf in the form of animation.
You can improve this animation by increasing the value of
the animation's precision slider.
Display Bookshelf Shadow
This will add shadow to the Bookshelf.
|
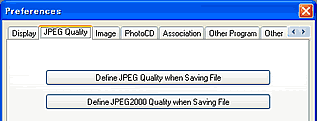
| JPEG Quality |
|
|
Function
This defines quality (compression rate) when you save
your DigiBook® images in JPEG.
JPEG2000 is a new specification with lighter data than existing
JPEG but that does not compromise quality.
Define JPEG Quality when Saving File
A panel on quality definition will appear if you click on
"Preferences"of quality settings when saving an image as
a JPEG file. Define quality by moving the slider using values
from 0 to 255.
Define JPEG2000 Quality when Saving File
A panel on quality definition will appear if you click on
the bottom on "Setting"of quality when saving an image as
a JPEG2000 file. Define quality by moving the slider using
values from 0 to 255.
|
| Image |
|
|
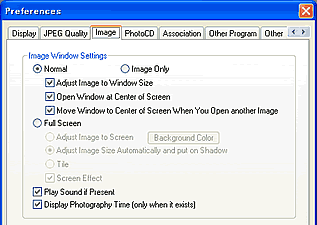
Function
This is to set the image display window. If you set it to
"Normal Window", your images will be displayed in
Windows' standard window with the bar on top, but if you select
"Image Only", you will only have the images without
the bar.
Normal Window
The window has a standard bar on top, with the maximize,
minimize, and close buttons on its right side. To move this
window, click on the top bar and drag it.
Image Only
This is to display only the image without the bar. In this
case, to close the image display window, either select "Close"from
the menu on top of the window, or press the "Esc"key from
the keyboard. You can also move this window by clicking
on the image itself.
Adjust the display size to the size of the window
The display size is automatically adjusted to the
size of the window. If you change the size of the
window, this will automatically reflect the size of
the image.
Display at center of screen
If you check
this item, the image display window will move to
the center of the screen. If you uncheck, the window
will shift to the top left side of the screen.
Move the window to the center of the screen
when a different image is displayed
Regardless
of the position of the window, if you use the same
window to display the next image by rotating the
wheel (if you have a mouse with a wheel), or by
using the"left"key and the"right"key from the keyboard,
the window will still shift to the center of the
screen.
|
Full Screen
The image will cover the entire screen.
When you wish to cancel this and go back to the previous
scree, press the "Esc" key on your keyboard.
*You cannot use the edit function when the image is displayed
on the entire screen.
Adjust Image to Screen
The image will fit to the size of the screen. To set
the color of the blank space, select a color from
the "Background Color"button.
Tile
This will tile the image on the screen
Adjust Image Size Automatically and Add Shadow
DigiBook® will automatically adjust the size
of the image and add shadow.
Screen Effect
When you use the same window to display the next
image, you can activate screen effects by pressing
on the"left"key and the"right"key, or by rotating
the wheel(if you have a mouse with a wheel).
|
Play Sound if Present
If you check this item, DigiBook® will play sound if
present in the image you wish to display.
Display photography date/time at the bottom right of
the image (when applicable)
Some images taken with the digital camera contain information
on date/time of photography in the data. If so, the data
will appear on the bottom right side of the screen. If the
image contains no such information, you will see instead
the time and date the file was created.
|
| Photo CD |
|
|
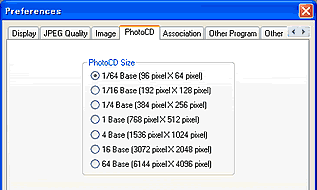
Function
DigiBook® will configure the screen size when reading
Photo CD. Screen size is measured in pixels.
(Caution)
You cannot edit the image while the image is in PhotoCD
format. To edit, you must first convert the image using
functions such as bulk conversion.
|
| Association |
|
|
Function
You can associate DigiBook® files with other applications.
By associating with for example tools for text data or sound
data editing, you can open your files with those programs.
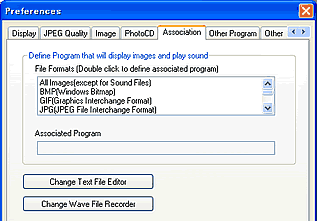
Define Program that will display images and play sound
This is to set the software that will be used to display
images and play sound.
Double-click an item on the file list to display the "Association"
dialog box. Use the "Browse" button to select
the program (exe) you wish to associate and click "OK".
If you click on "Back", you will go back to DigiBook®'s
display/play settings.
Change Text File Editor
This will change the program(software) used to edit text.When
you select this, a "Define Program"dialog box will appear.
Use "Browse"to select the associated program (.exe), and
click on "OK".If you click on "Back", you will go back to
DigiBook®'s default preferences.
Change Wave File Recorder
This will change the program (software) used to record sound.
When you select this, a "Define Program"dialog box will
appear. Use "Browse"to select the program to associate (.exe),
and click on "OK".If you click on "Back", you will go back
to DigiBook®'s default preferences.
|
| Other Program |
|
|
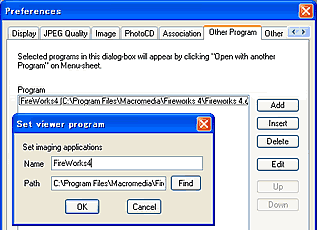
Function
You can add application programs other than DigiBook®
and use them to open images.
If you click on "Add", a "Set Other Program" dialog
box will appear. Use the "Browse" button to select the program
(.exe) that you wish to add with the "Browse Executable
File", and click on "Open". You will see the program path
under "Path", Enter the name of the program under "File
Name" and click on "OK". The program will be added and the
name of the program will appear on the list.
You can add several programs to the list. The order in
the list corresponds to the order in the menu. You can always
select "Add" to add a new program to the list. If you wish
to delete a program, select the program and click on "Delete".
If you wish to change the content of the added program,
select the program, click on "Edit", and once the editing
is done, click on "OK". If you wish to change the order
in the list, select the program, and use the "Up" or "Down"
buttons.
|
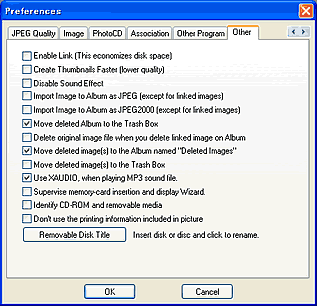
| Other |
|
|
Function
This page is useful to customize functions such as importing
images in the form of links, creating thumbnails faster, or
importing images as JPEG files to facilitate your album-creating
task.
Enable Link
If you select this item, DigiBook® will not copy the
file in the data folder; it will import only the image information
and thus will read the linked image when you wish to display
it. This economizes disk space.
(Caution)
Note that you cannot view the image in the album if you
move or delete data from the link.
Create Thumbnails Faster
If you select this item, the image-importing process will
be faster but this will affect the quality of thumbnails.
Disable Sound Effect
If you select this, you will not hear sound effects when
using DigiBook®.
Import Image to Album as JPEG
If you select this, images will be imported as JPEG. However,
the images will not be converted if they have been loaded
as links.
You can adjust the quality of images imported as JPEG if
you go to "JPEG Quality" under "Preferences".
Import Image to Album as JPEG2000
If you select this, images will be imported as JPEG2000.
However, the images will not be converted if they have been
loaded as links.
You can adjust the quality of images importe JPEG2000 if
you go to "JPEG Quality" under "Preferences".
Move Deleted Album to the Trashbox
If you select this, Albums deleted from the Bookshelf will
be transferred to Windows' trashbox.
Delete Linked Image when you Delete Thumbnail
When"Import linked Image to Album" is selected and you delete
the image from the Album, the linked image is also deleted.
Move Deleted Images to Album named "Deleted Images"
This will save deleted images and deleted albums on the
album titled "Deleted Images". This may take some time to
delete images and albums, but it is reassuring because you
can restore deleted items.
(Caution)
Note that you cannot restore items after deletion unless
you select this option.
Move Deleted Images to Trashbox
If you select this, images deleted from the Album will be
transferred to Windows' trashbox.
Supervise Insertion of Memory Card and Display the Wizard
If you select this item, a supervision program will be resident
on the task bar.
This allows the supervision of not only the memory card
but also of the CD-ROM and MO at regular time intervals,
and will automatically start the Album Creation Wizard after
insertion.
Identify CD-ROM and Removable Media
If linked image are saved on CD-ROM or MO, Kureamon will
identify the media before loading.
Don't Use Printing Information Included in Picture
This will ignore printing information contained within
the image data when printing an image.
|
|
|